
The purpose of this -short- tutorial is to guide you until you can send and read a « HelloWorld » message passing through Tibco RendezVous
Installation
Main Runnables
RVD: Daemon
Installation
- Set the variable JAVA_HOME
Eg, in my case:
set JAVA_HOME=C:\java\jdk150_10 - Get the file to be installed:
TIB_rv_8.1.2_win_x86_vc8.zip - Unzip the content in your local drive
- Launch the installer (.exe)
- select Custom installation
- choose the installation folder, eg: C:\tibco
- keep default options for other requests
- Set the variable TIBRV_HOME
Eg, in my case:
set TIBRV_HOME=C:\tibco\tibrv\8.1
Main Runnables
RVD: Daemon
- Launching the daemon on local host on port 8181 (default port: 7580):
rvd -http 8181
You should see the following trace:

tibrvsend: send a message
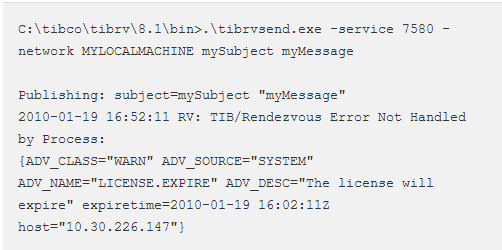
To send a message on myLocalMachine:7580:
.\tibrvsend.exe -service 7580 -network MYLOCALMACHINE mySubject myMessage
Expected output:
To send a message on myLocalMachine:7580:
.\tibrvsend.exe -service 7580 -network MYLOCALMACHINE mySubject myMessage
Expected output:
tibrvlisten: listen to messages
Abstract
To listed to messages published on MYLOCALMACHINE:7580, related to subject mySubject:
tibrvlisten -service 7580 -network MYLOCALMACHINE mySubject
Use case: HelloWorld
For instance, let’s assume that you launch this command from one frame:
C:\tibco\tibrv\8.1\bin>.\tibrvsend.exe -service 7580 -network localhost mySubject HelloWorld Publishing: subject=mySubject "HelloWorld"
Here is what appears in the « listening » frame:
2010-01-19 17:01:32 (2010-01-19 16:01:32.990000000Z): subject=mySubject, message={DATA="HelloWorld"}
Notice you can have many instances listening to the same messages.
Other runnables
Launch the daemon manager
- Launch:
cd %TIBRV_HOME%/RVDM ./RVDM.bat -http 8282 . - You should see following messages, that you can ignore:
- To check the daemon is on, you can open the address http://localhost:8282 on your favorite browser.
Example sources are available in folder %TIBRV_HOME%/src/examples/java
Misc
TIBRV_HOME\bin folder fosters a couple of binaries:
- rvntscfg.exe: Services Configuration Program
For training on TIBCO BusinessConnect mail us at [email protected]
 RSS Feed